Saturday, November 15, 2014

Porter Progress!!


Wow, I'd say it's about time to dust off the cob webs and get this shin-dig rolling again!

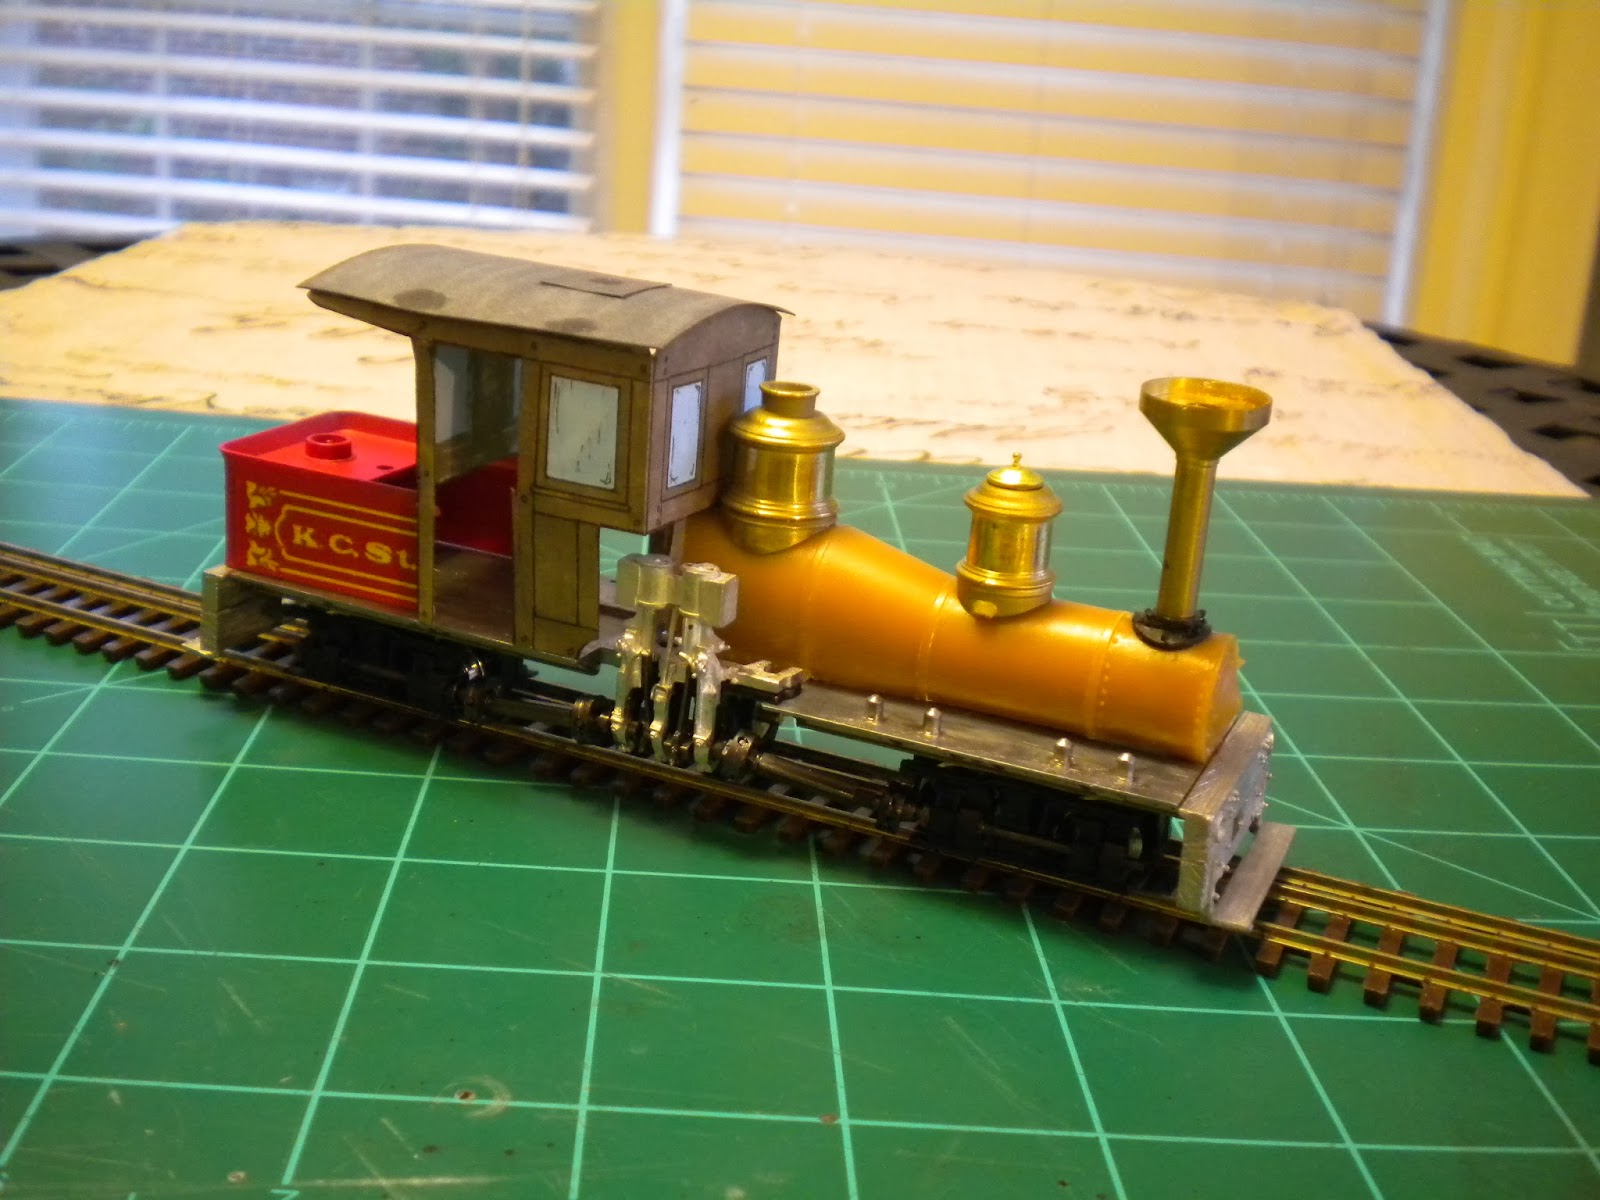
Sorry that's it's been a while since I've made any major updated here. As I'm sure you all know real life is a higher priority than our little miniature realms of fancy. So between those priorities, distraction, and just plain procrastination... I have FINALLY made some considerable progress on one of my locomotives for the Ocalla Tramway. However, I need to go back a week or two to really get things up to speed.

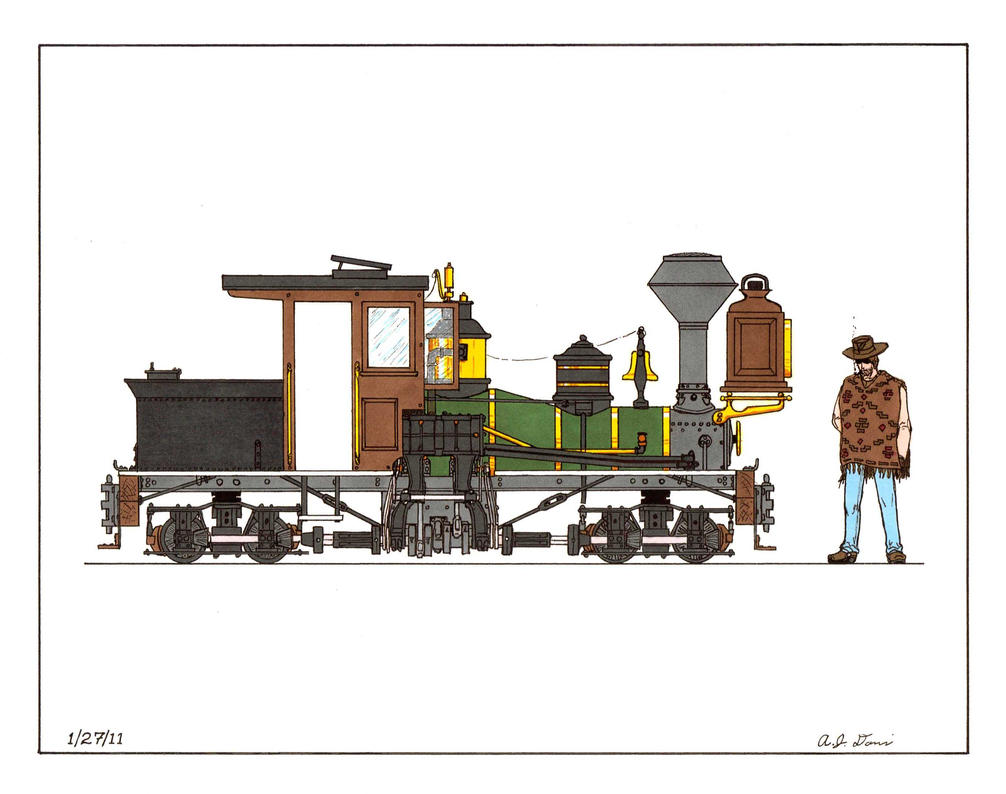
Once of the things I've had to ponder over is how to mimic the spark arresting stacks of the larger Arizona Copper Company's Porters. (Specifically engines 9 and 10) And although some labor was involved I've come up with a pretty close match. The bottom portion of the stack scavenged from an old Pull Back toy train I had years and years ago. I saved the stack thinking I might use it one day, turned out I was right! The toy was based on a cross between the Central Pacific "Jupiter" and the V&T 4-4-0 to create a generic old time train toy. The top part was made of plastic and was removed which left a lip on the top that was unsightly. The lower portion is made from white metal and so the lip was carefully filed down to match the profile of the stack. The top portion is modified from a Precision Scale Co. Radley Hunter stack casting, cutting and filing off excess material to give the correct profile of the ACC engines. the photo below shows the results of my efforts.


After this photo was taken the stack was shortened to a more suitable height. Although it is not an exact match to the ACC prototypes, in fact it's actually a bit larger, it's pretty darn close and that's good enough for me.

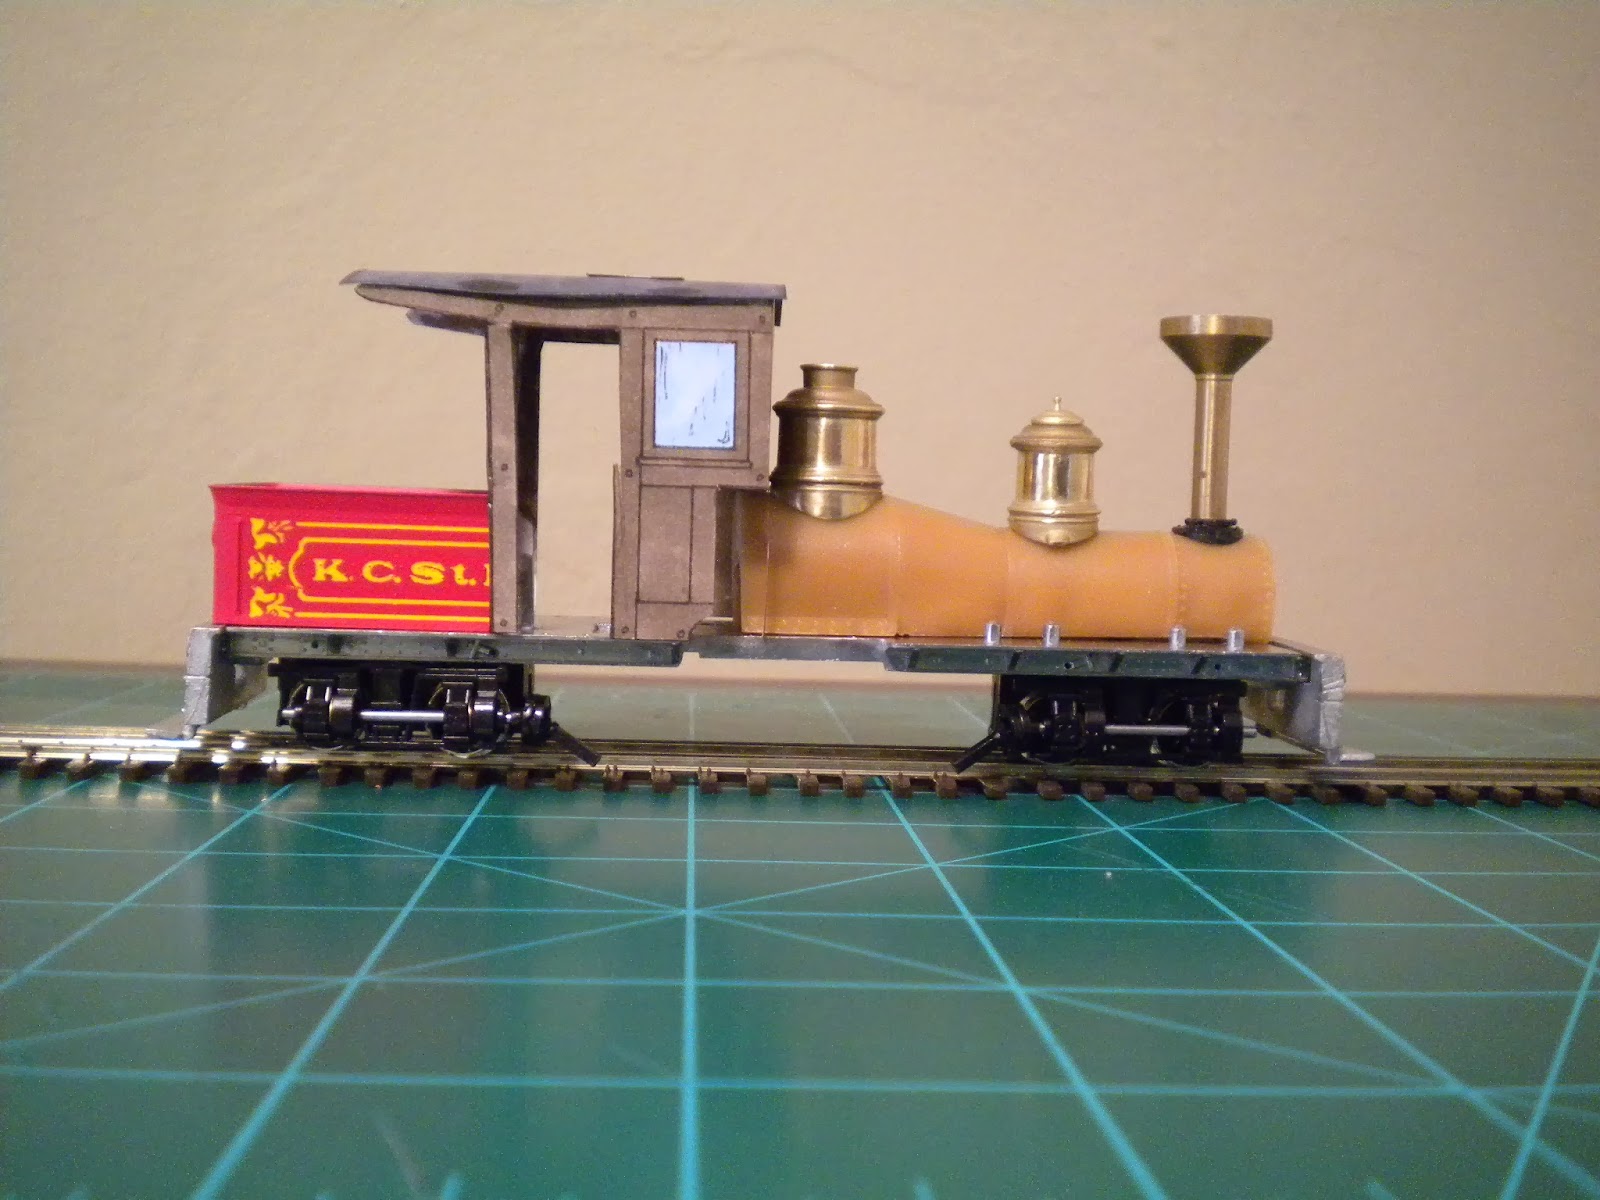
Yesterday and part of today I worked on one of the more challenging aspects of making a 20" gauge outside frame Porter, widening the frame of the Grandt Line kit. fortunately the cylinder saddle was a virtual dead on match. And the drawings of ACC engines 9 and 10 in the March 04 edition of the Logging, Mining & Industrial Annual shows the frame spacing also. And I was able to cut out some notches so that the model's frame members fit securely and hold the proper width. Modifying the firebox front to accept the new frame spacing was a little more difficult. But here are some photos of everything loose fit together.


The fitting still needs a bit of refining. A new steel "plantation" style cab and narrowing the cab floor to keep the locomotive to a maximum width of 6 scale feet. Again, mimicking the ACC engines. The dome on the tank is the original steam dome from the Grandt Kit and is being used as the new sand dome, which were rather large for these engines compared to earlier Porter locomotives. But given the sharp curves and steep grades of the original Coronado railroad the engines probably used a lot of sand. I'm not completely happy with the dome and I'm still looking at my options, but if need be I can deal with it. As for the in-cab steam dome it will be built up using some 1/2 brass tubing and a MDC small diamond stack.

Now that I've wet my feet again with this engine I'll either work on it some more or work on the "Spud" again. I also have a stone base water tank in the works. So more is sure to come! Stay tuned!

Saturday, April 19, 2014

Update on a growing Spud

Well now it certainly has been a while, hasn't it? Sorry about my absence, but I'm sure all of you know how real life can effect our miniature worlds. Over the past few months I've had a lot on my plate and even took a short hiatus of sorts. And now I have returned with some progress I believe you will enjoy.

I tend to bounce between projects to keep myself from getting "burned out" on them. And at present my current project is a small mining Porter which I've lovingly dubbed "Spud". The chassis is a Bachmann N scale/gauge 0-4-0. In order to make the locomotive 20" gauge I began fabricating some frame overlays to help space the gauge and add a hint of detail to an often forgotten part of a model locomotive. Now I'll admit I don't know much about prototypical locomotive construction, but I tried to give at least the impression of a locomotive frame.


Here the photo shows the new overlays scratched from styrene. Below is a drawing I made for the Spud in scale. The next photo shows how they appear on the chassis.


I left the extensions to the forward part to the frame because I wasn't sure where I would need to cut them for the pilot beam. The area that will contain the motor I'll shroud with thin styrene and make it appear to be a firebox. Fortunately some of the left over cab details from the WMS Sn3 shay kit will work quite well for cab details on the Spud.

Another challenge were the cylinders. The stock plastic cylinders just seemed to look too small proportionally so I looked into replacing them with a set of HOn3 C-16 cylinders. When I made the scale drawing for Spud I drew the cylinders to look proportional, and that was LONG before I even found a new cylinder set! However, as the next photo shows, my proportional guess was actually pretty dang close!


As you can see my guess-ta-mated measurements were fairly accurate. The drawing was made on 1/4" graph paper, so that should give you an idea of how small this engine will be. The cylinders were given to me by a good friend of mine who has helped me with many of my projects in a number of different scales.


I have yet to have the cylinders soldered together, a friend of mine has offered his help for that. And I have yet to find a set of crossheads that will fit the guides.

Well it's not much, but it's something. Sorry I don't have more after being a way for so long. But hopefully I'll be posting with more frequency in the near future! Thanks for watching and please feel free to leave comments.

Tuesday, February 11, 2014

A new engine and blackened drive lines.

Hey all, sorry it's been a while. Just had a lot of personal stuff going on lately. But I have good news! I've made some small progress on the shay. The neolube arrived a little while ago as well as the replacement engine castings from WMS.

The casting looks great! But sadly the engine is a little smaller that the one I originally was using. So proportionally it's a little smaller than I'd like. The other issue is that when assembled with the rest of the drive line, as per the instructions, and I had clearance issues again with the crank shafts and the rail head. I tried to file off some of the frame to raise the engine assembly, but still I didn't have enough clearance. I then loose fit the included replacement bolsters, but then the whole locomotive looked like it sat too high! So I tried something else and attached the engine assembly to the TOP of the frame. The clearance is more than adequate and I had to cut new square tubing, but it looks pretty good as the accompanying photos shows.


I also blackened the rest of the line shafts using neolube, which shows better in the next photo. I used it on everything and even the wheel faces. The shafts turn in a hit or miss kind of motion, sometimes they turn well and other times it doesn't. Especially when moving backwards.


As you can see the neolube has done wonders for the appearance of the line shafts! Though even when the solution has dried it doesn't take well to handling. It seems to rub off fairly easily. It may handle better if I use gloves next time.

Another thing I'm now experimenting with is a head light. I've had an old white metal headlamp casting, but no bracket. But on a whim I decided to use the Sn3 one supplied with the WMS kit, which really is the same as an HO scale bracket. I originally thought it was too small, but I tried it out and it doesn't look half bad! At least to my eye, which the following photos show.


The head light isn't fixed in place, it's just resting there with the aid of some over sized tweezers.But with the addition of the headlamp, the engines is starting to really look like a locomotive! Still have a long way to go, but at least it's coming along. So this isn't very much of an update, but it's something.

Sunday, January 26, 2014

A lit'll tender for a lit'll Shay!

Well thankfully what I thought to be a junked shay kit came in the other day. I found the kit on ebay, and what was described as an incomplete kit turned out to be just the opposite! All that was really missing were the instructions. This was a huge blessing on my little Ocalla Shay, as it was a 2-truck kit, so I won't have to make the awful surgery i was going to have to do with the three truck kit. Though I will have to drill a few new holes so I can mount the shay engine in a more ideal position and optimize the locomotive's tight turning radius. Along with a multitude of parts to salvage from. Although I do feel a slight hint of guilt considering how increasingly rare these kits are becoming. I hope that one day SOMEONE will begin reproducing the MDC Shay kits. Despite their cantankerous reputations, they're extremely fun and I've gotten many hours of pleasure from working with them.

Not too long ago I was able to get an AHM old time 4-4-0 tender shell. I cut the shell in two, right behind the tool boxes. After test fitting everything on the new 2 truck frame here is what the outcome was, shy of the engine and line shafts.


As you can see the locomotive is REALLY starting to come together! Even if the cab is a mock up made out of paper. Though there is one thing that concerns me just a bit. With the mock up cab in place as well as the tender, the back of the tank is actually resting atop the end beam. I'm really liking the cab dimentions... but if I shorten the tank, I think it will look too short proportionally. Though I could alter the cab dimensions and shorten it by 3 to 6 scale inches. I'm just not totally sure what to do there, but I'll think of something. The issue is hard to see in these photos, but the side view below will give a better illustration.


As can also bee seen, I've been lazy and have yet to fix the "Off Side" of the truck frames to the trucks. My focus has been to get the line shafts to turn freely under push power alone and reduce as much binding as possible. The reach ruck still needs a little work, but turns fairly easy. just not easy enough yet. I still have quite a ways to go, but at least the shay is starting to look like a respectable locomotive! Thanks for tuning in, and there's more to come!

Behold, a Humble Potato.

Okay, I have to admit the title for this one is a bit wierd... but it fits the name of this locomotive I have in progress. This post is about a small mining Porter I came up with while on a trip to Indiana. I was in a class room and I started a VERY rough pen sketch for a mining locomotive inspired by the "Wallis", which some of  you other 20" gauge aficionados may know well. It was a small 20" gauge locomotive built by Baldwin and worked at one of the gold mines somewhere in California.


As some of you may or may not know, I tend to have an eye for things that stand out and are odd in the world of railroading. Whether it be narrow, broad, or standard gauge. I loved the chunky and squat proportions of the Wallis and with that inspiration scratched together this concept. Though I prefer the Porter "label" rather than Baldwin. (With no offense to Baldwin fans)


And so I present to you, my humble "Spud". So name because its squat and compact proportions remind me of a potato! I have made some O scale drawings for the model and when I can get a scanner up and running I'll post them here along with a few other things.

For a while I've been debating on whether I should keep this locomotive N gauge and use it on On18 mine tunnels and addits, or to make everything 20" gauge and widen the mechanism to On20. I'm leaning more towards On20... but I'm still questioning what to do. I'm open to thoughts and suggestions.
As for the mechanism itself, I'm using a Bachmann N scale 0-4-0 chassis I picked up from a model train show in Myrtle Beach, SC. It was quite a bargain and it ran very well! Despite some of the things I've heard about the chassis.

Almost nothing of the original locomotive, aside from the chassis, will be left. I'll be replacing the cylinders with a set of old Kemtron HOn3 C-16 cylinders a friend of mine is sending to aid in me in this particular project. Again, thanks Matt!

The boiler I'm fashioning out of 1/2" OD brass tube and the rest I intend to make out of styrene sheet. Here are some shots of the eventual "boiler".


For the front, I'm thinking about ordering the 25.5" diameter smokebox front offered by Coronado Scale Models. Seeing as this tube would be 2 scale feet in diameter it should look just about right. And I can get a headlamp from wither Grandt Line of from Wiseman Scale Models.

However, the problem I'm having is, for one, I haven't found any places locally where I can get the stuff. There's a Hobby Lobby, but I'm not certain if they carry it at this location. Second, without being able to look at the stuff I'm not sure what the best sheet thicknesses would be to fabricate the tank, cab, and other details. I figure once I have the cab walls made that I can use wire or metal rod for the roof supports. Anyway, here are some current photos of the Spud.


It's not a whole lot, more text than anything, but it's something in addition to my shay. Which is progressing nicely. And I'll have a nice post about that soon. Thanks for tuning in!

Tuesday, January 21, 2014

A Mock-Up Cab for the Ocalla Shay!

Well progress has slowed quite a bit recently on the shay. My quick "patch job" on the crank shaft assembly fell apart and now is utterly useless... I was fortunate enough to find another shay kit to salvage parts from and hopefully I won't mess things up the next go-round. I'm also going to contact WMS to see if I can get a better 2-Cylinder casting and some other details for the shay. In the mean time I started working on the "Spud", my little 0-4-0T mining Porter, but more on that in a future post.

However today I decided to start working, or rather planning, the cab of my Shay locomotive. I drew out the cab in scale on 1/4" graph paper, but done in a way that would allow the cab to be cut out and folded into a mock-up pattern. Once the drawings were done I made a copy of the drawings on heavy printer paper and then colored the drawings by hand with markers. Once the paper was dry I carefully cut out the drawings and then scored certain edges to help when folding the mock-up.


It has surprised me how similar this project is turning out to look like my original concept I drew a few years ago when I first conceived this project! Here is a side view of the locomotive as it looks presently and there drawing will be below it for comparison.


The resemblance is pretty uncanny for a drawing not done to scale, wouldn't you agree? Also as a note I've decided to forego the use of the supplied tender tank(s) from the MDC kit and I'll be using an AHM/Rivarossi Old Time 4-4-0 tender shell for the tank. It's shorter in height than I'd like and not as wide, but I think it will work perfectly for the look I'm going for and it saves me from having to fabricate my own tender flare. Not to sound lazy or anything.

Anyway, thanks for dropping by and stay tuned. As always there will be more to come! Thanks for watching!

Sunday, January 12, 2014

2 Cylinders

So I've modified the crank shaft and engine to be more typical of a Shay locomotive of such small size. It's actually been a bit frustrating and it still needs much work. I drilled a new hole so I can mount the engine casting and modified crack shaft assembly closer to the center of the locomotive. Theoretically the engine should operate just fine on strait track and broad curves, but that wouldn't be much of a mining railroad would it? My goal was to get the locomotive to negociate a 9" radius curve... but I may have to make it 10" radius instead. A left hand turn would be the worst, in that the telescoping parts of the universals simply drop out and would certainly cause problems when operating on a steep and twisting track through the often rugged Arizona desert. Sadly I only have one photo this time.


It's not pretty by any means as you can see. Everything is just mocked up or temporarily "press fit" into place just so I can get an idea of where things are going. I bored out part of the engine casting so that the "rods" to the crank shaft have some clearance and will hopefully look like pistons moving up and down in their guides.

As a side note, I've been trying to use the supplied tender shells of the kit to make the tender tank. However I'm not too happy how it's coming out and from the looks of it wouldn't look much like what I have in my concept drawing, as shown below.


I have no clue how I could model the tender flare, so I was able to find an old AHM "J.W. Bowker" tender shell which should do just fine for a replacement. In the mean time I may start working on some of my Porter projects mentioned in previous posts.