Sunday, January 26, 2014

A lit'll tender for a lit'll Shay!

Well thankfully what I thought to be a junked shay kit came in the other day. I found the kit on ebay, and what was described as an incomplete kit turned out to be just the opposite! All that was really missing were the instructions. This was a huge blessing on my little Ocalla Shay, as it was a 2-truck kit, so I won't have to make the awful surgery i was going to have to do with the three truck kit. Though I will have to drill a few new holes so I can mount the shay engine in a more ideal position and optimize the locomotive's tight turning radius. Along with a multitude of parts to salvage from. Although I do feel a slight hint of guilt considering how increasingly rare these kits are becoming. I hope that one day SOMEONE will begin reproducing the MDC Shay kits. Despite their cantankerous reputations, they're extremely fun and I've gotten many hours of pleasure from working with them.

Not too long ago I was able to get an AHM old time 4-4-0 tender shell. I cut the shell in two, right behind the tool boxes. After test fitting everything on the new 2 truck frame here is what the outcome was, shy of the engine and line shafts.


As you can see the locomotive is REALLY starting to come together! Even if the cab is a mock up made out of paper. Though there is one thing that concerns me just a bit. With the mock up cab in place as well as the tender, the back of the tank is actually resting atop the end beam. I'm really liking the cab dimentions... but if I shorten the tank, I think it will look too short proportionally. Though I could alter the cab dimensions and shorten it by 3 to 6 scale inches. I'm just not totally sure what to do there, but I'll think of something. The issue is hard to see in these photos, but the side view below will give a better illustration.


As can also bee seen, I've been lazy and have yet to fix the "Off Side" of the truck frames to the trucks. My focus has been to get the line shafts to turn freely under push power alone and reduce as much binding as possible. The reach ruck still needs a little work, but turns fairly easy. just not easy enough yet. I still have quite a ways to go, but at least the shay is starting to look like a respectable locomotive! Thanks for tuning in, and there's more to come!

Behold, a Humble Potato.

Okay, I have to admit the title for this one is a bit wierd... but it fits the name of this locomotive I have in progress. This post is about a small mining Porter I came up with while on a trip to Indiana. I was in a class room and I started a VERY rough pen sketch for a mining locomotive inspired by the "Wallis", which some of  you other 20" gauge aficionados may know well. It was a small 20" gauge locomotive built by Baldwin and worked at one of the gold mines somewhere in California.


As some of you may or may not know, I tend to have an eye for things that stand out and are odd in the world of railroading. Whether it be narrow, broad, or standard gauge. I loved the chunky and squat proportions of the Wallis and with that inspiration scratched together this concept. Though I prefer the Porter "label" rather than Baldwin. (With no offense to Baldwin fans)


And so I present to you, my humble "Spud". So name because its squat and compact proportions remind me of a potato! I have made some O scale drawings for the model and when I can get a scanner up and running I'll post them here along with a few other things.

For a while I've been debating on whether I should keep this locomotive N gauge and use it on On18 mine tunnels and addits, or to make everything 20" gauge and widen the mechanism to On20. I'm leaning more towards On20... but I'm still questioning what to do. I'm open to thoughts and suggestions.
As for the mechanism itself, I'm using a Bachmann N scale 0-4-0 chassis I picked up from a model train show in Myrtle Beach, SC. It was quite a bargain and it ran very well! Despite some of the things I've heard about the chassis.

Almost nothing of the original locomotive, aside from the chassis, will be left. I'll be replacing the cylinders with a set of old Kemtron HOn3 C-16 cylinders a friend of mine is sending to aid in me in this particular project. Again, thanks Matt!

The boiler I'm fashioning out of 1/2" OD brass tube and the rest I intend to make out of styrene sheet. Here are some shots of the eventual "boiler".


For the front, I'm thinking about ordering the 25.5" diameter smokebox front offered by Coronado Scale Models. Seeing as this tube would be 2 scale feet in diameter it should look just about right. And I can get a headlamp from wither Grandt Line of from Wiseman Scale Models.

However, the problem I'm having is, for one, I haven't found any places locally where I can get the stuff. There's a Hobby Lobby, but I'm not certain if they carry it at this location. Second, without being able to look at the stuff I'm not sure what the best sheet thicknesses would be to fabricate the tank, cab, and other details. I figure once I have the cab walls made that I can use wire or metal rod for the roof supports. Anyway, here are some current photos of the Spud.


It's not a whole lot, more text than anything, but it's something in addition to my shay. Which is progressing nicely. And I'll have a nice post about that soon. Thanks for tuning in!

Tuesday, January 21, 2014

A Mock-Up Cab for the Ocalla Shay!

Well progress has slowed quite a bit recently on the shay. My quick "patch job" on the crank shaft assembly fell apart and now is utterly useless... I was fortunate enough to find another shay kit to salvage parts from and hopefully I won't mess things up the next go-round. I'm also going to contact WMS to see if I can get a better 2-Cylinder casting and some other details for the shay. In the mean time I started working on the "Spud", my little 0-4-0T mining Porter, but more on that in a future post.

However today I decided to start working, or rather planning, the cab of my Shay locomotive. I drew out the cab in scale on 1/4" graph paper, but done in a way that would allow the cab to be cut out and folded into a mock-up pattern. Once the drawings were done I made a copy of the drawings on heavy printer paper and then colored the drawings by hand with markers. Once the paper was dry I carefully cut out the drawings and then scored certain edges to help when folding the mock-up.


It has surprised me how similar this project is turning out to look like my original concept I drew a few years ago when I first conceived this project! Here is a side view of the locomotive as it looks presently and there drawing will be below it for comparison.


The resemblance is pretty uncanny for a drawing not done to scale, wouldn't you agree? Also as a note I've decided to forego the use of the supplied tender tank(s) from the MDC kit and I'll be using an AHM/Rivarossi Old Time 4-4-0 tender shell for the tank. It's shorter in height than I'd like and not as wide, but I think it will work perfectly for the look I'm going for and it saves me from having to fabricate my own tender flare. Not to sound lazy or anything.

Anyway, thanks for dropping by and stay tuned. As always there will be more to come! Thanks for watching!

Sunday, January 12, 2014

2 Cylinders

So I've modified the crank shaft and engine to be more typical of a Shay locomotive of such small size. It's actually been a bit frustrating and it still needs much work. I drilled a new hole so I can mount the engine casting and modified crack shaft assembly closer to the center of the locomotive. Theoretically the engine should operate just fine on strait track and broad curves, but that wouldn't be much of a mining railroad would it? My goal was to get the locomotive to negociate a 9" radius curve... but I may have to make it 10" radius instead. A left hand turn would be the worst, in that the telescoping parts of the universals simply drop out and would certainly cause problems when operating on a steep and twisting track through the often rugged Arizona desert. Sadly I only have one photo this time.


It's not pretty by any means as you can see. Everything is just mocked up or temporarily "press fit" into place just so I can get an idea of where things are going. I bored out part of the engine casting so that the "rods" to the crank shaft have some clearance and will hopefully look like pistons moving up and down in their guides.

As a side note, I've been trying to use the supplied tender shells of the kit to make the tender tank. However I'm not too happy how it's coming out and from the looks of it wouldn't look much like what I have in my concept drawing, as shown below.


I have no clue how I could model the tender flare, so I was able to find an old AHM "J.W. Bowker" tender shell which should do just fine for a replacement. In the mean time I may start working on some of my Porter projects mentioned in previous posts.

Friday, January 10, 2014

Shay Progress and Clearance Issues

Well I've been fiddling with the shay for the past few days in my spare time between daily errands. I have made some progress though, I was able to work out the bind in a part of the cosmetic drive train and fixed the "running" side of the side frames to the trucks. I also ground off the pins that limit how far the trucks can swivel to maximize (or rather minimize) the minimum track radius. My goal is to get the engine to operate on a 9" radius curve as a set minimum.

I then turned my attention to the engine cylinders. I'm wondering if the S scale 2-Cylinder shay engine casting from WMS (Wiseman Model Services) may have been defective as it doesn't match the look and assembly description in the Sn3 conversion kit instructions. I originally intended to call Mr. Wiseman up and see if I could get a replacement, but then I elected to see if I could make it work regardless. I cut off the cylinders with a razor saw and placed the parts on my parts box. (I may be able to use them for another build) I then mocked everything up on the model and set it on the track and took some photos. Though when I did I happened to notice something...


As you can see the I think I have a bit of a clearance issue here. I didn't account for the additional thickness of the WMS casting along with the original plastic part. I've already started working on remedying the problem and I will post pictures shortly. I'll also see if I can modify things to make this a proper 2-Cylinder engine and drive line. Until then I have a few other pictures that I think you will enjoy.

On a whim I elected to pose the say together along with my O scale reference figure, which I have now randomly dubbed "Fred".


Although the caboose fits proportionally, it's actually too wide for me to use for On20, by about a scale foot or so. I decided to have a set Loading Gauge for my On20 models that will make constructing future models a bit easier. In short, I've made some On20 guide lines. The set width I've chosen is 6 scale feet. This width was decided on because of the Arizona Copper Co.'s locos #9 and 10. Both were BIG, for 20" gauge, 0-4-4 types built by H.K. Porter and were the larges engines used on the ACC's 20" gauge network. They may possibly have been the largest 20" gauge engines ever built also! But I don't know that for sure. Anyway, due to that bit of prototype inspiration all my current and future On20 equipment will be no wider than 6 scale feet.

Here's another view of my little Gnomy bobber bash with "Fred" to give an idea of just how small this little caboose is.


Here's one more view of the shay, this time right from the front. The model is sitting on a length of Micro Engineering HO/HOn3 code 70 flex track. The Ocalla Tramway will use code 55 rail, but my On30 Big Thunder & Western will use code 70. When I have the opportunity to actually build a substantial layout I very much plan on having some dual gauge trackage to have fun with. And again, Fred stands next to my little shay as a size reference.


I'm loving how this locomotive is turning out so far! It's going to be an adorable little steamer when she's done! Well that's about it for now, but stay tuned because more is on the way!

Sunday, January 5, 2014

Back on Track!

Hello and sorry for such a long absence. I have since moved twice and now settled back down in Georgia and hopefully I'll be staying put for a while. And I do have some good news to share with you all, I have FINALLY started construction on my On20 Shay!! This has been a project I've been planning for a long, long time and it feels great to actually be working on it and seeing it come to fruition. As part of the project I managed to locate and acquire the MDC Shay Handbook by Jeff Johnston. It has been an immeasurable help in the building process.

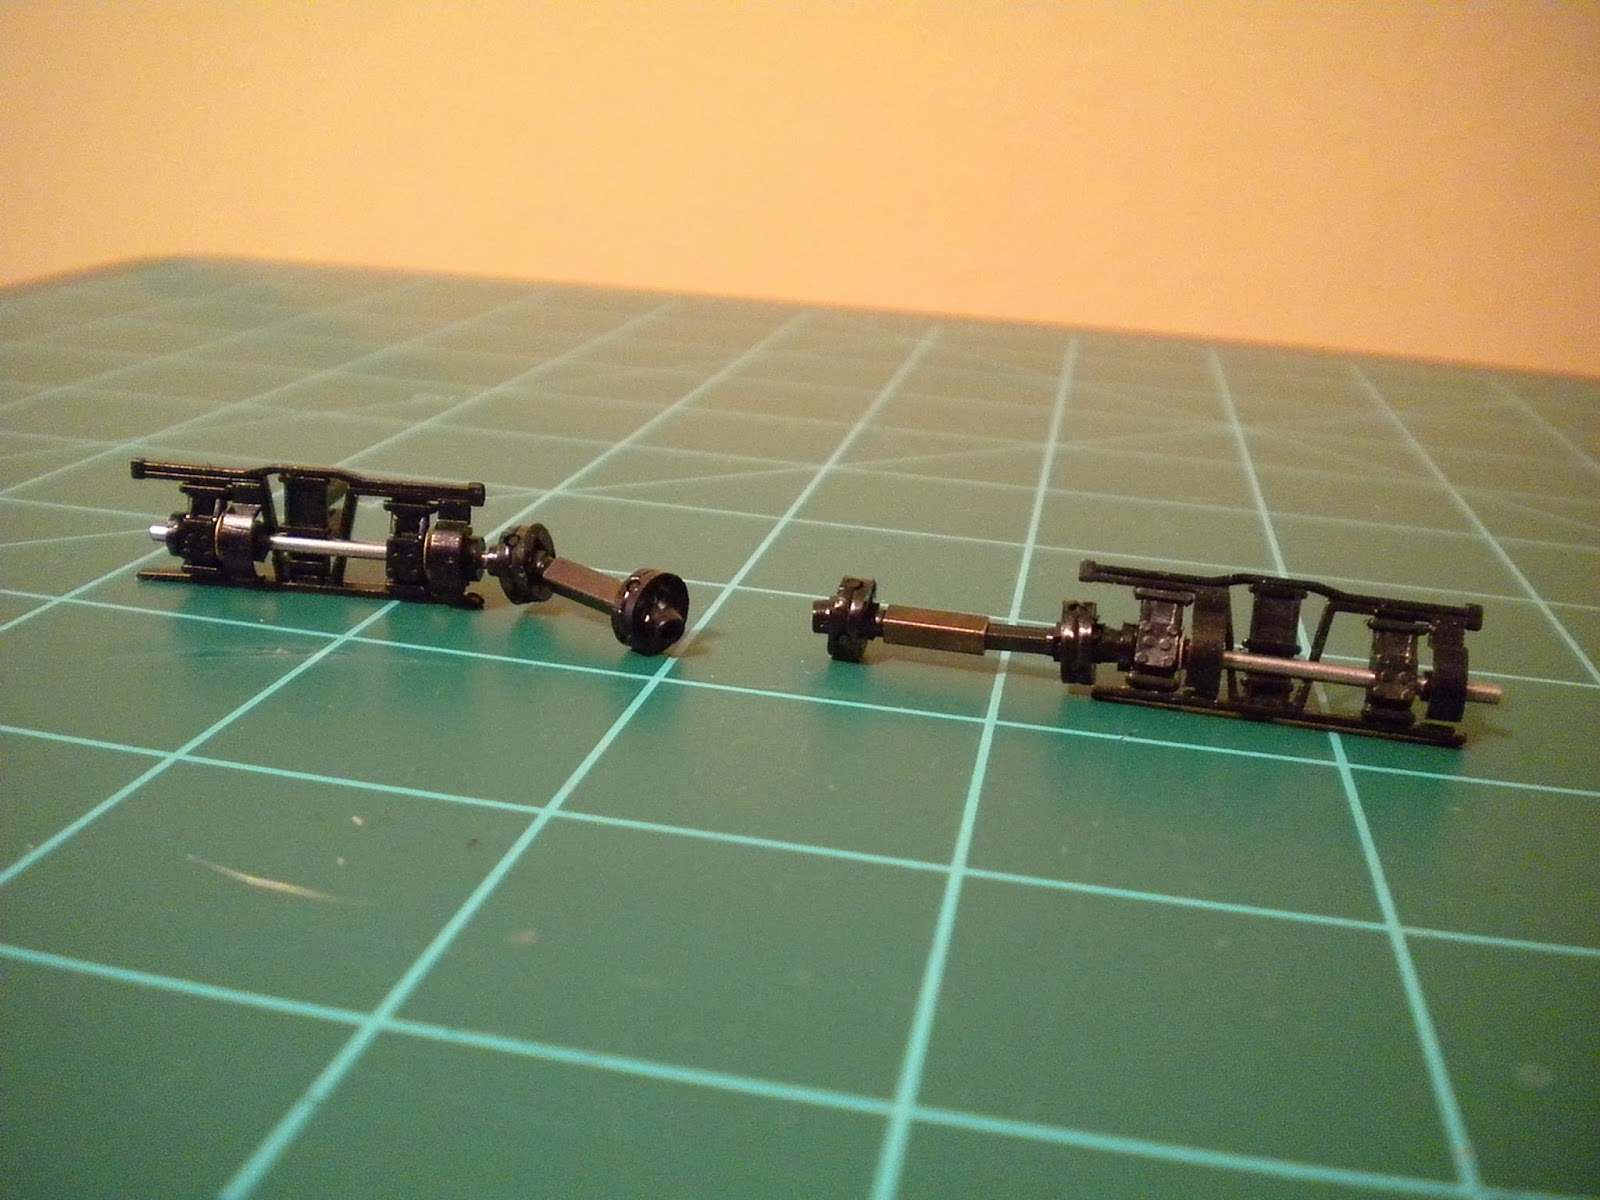
As mentioned in previous posts and hinted above I'm using a MDC Roundhouse Shay locomotive kit in HOn3. Unfortunately it is for a 3 truck locomotive rather than a 2 truck shay, however this allows me to lengthen the engine to a certain extent. First I started with the gear box. I already had the NWSL upgrades for both the gearbox and the axles. However, annoyingly, the gear box was in two pieces... but two of the same part. So regretably I had to scavenge the part from my HO standard gauge shay... which I'm still a little irritated with. But I'm sure I'll come across a junked shay at some point and be able to replace the gearbox for my HO model. Here's a current pic of the gearbox.


It still needs some fine tuning, but seems turn fairly freely. And after working on the gearbox I then turned my attention onto the trucks. After cleaning and deburring the worm gears I tested them by attaching the end of the worm gear shaft in a pin vice and turned by hand. I felt now resistance and the wheels seemed to turn freely. I wont be able to tell for certain until I can hook up the motor, gearbox and drive shafts and give it a test run.


I worked on the side frames next, following the instruction of the MDC Shay Handbook. The side frame and drive line for the rear truck turn just fine! However the one for the lead truck seems to be binding so it still needs some fiddling. I think the gear that meshes with the toothed drive wheel is binding against part of the frame, or at least that's my theory.


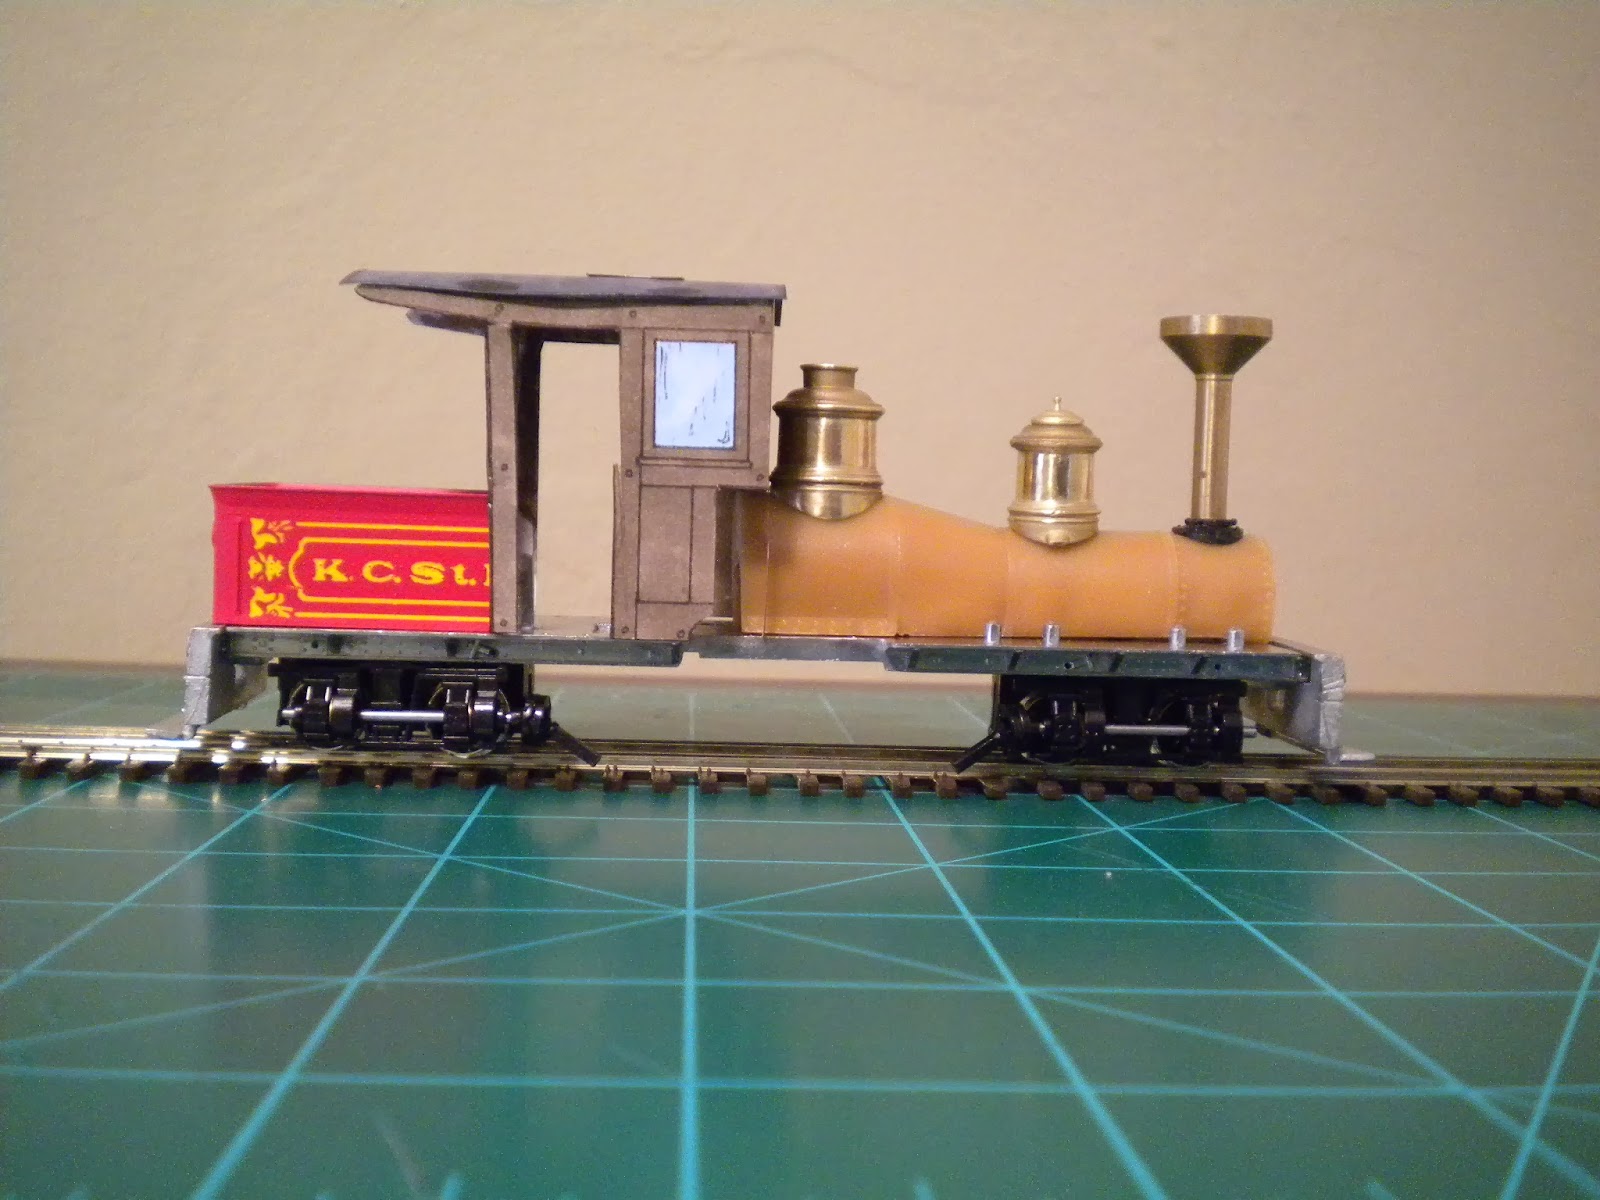
Well with the frame and trucks worked on a bit and using parts from a Wiseman Model Services Sn3 conversion kit I've been slowly piecing together the model. Here's a photo of how it currently looks.


The boiler, deck, cylinders, and end beams are all from the WMS kit. The domes are from Precision Scale Co. and the stack was made by Andrew Kernchen. He was a dealer at a train show in Atlanta, GA and the stack was intended to replace the one supplied with the Bachmann On30 Porter. Although a bit different from my concept drawing, it seems to fit rather will for my little shay. All the other parts not mentioned are from the stock MDC kit. And speaking of proportions, here's an idea of just how small this locomotive is.


Here is my model with a cheap plastic figure that is roughly O scale in size. The locomotive measures 6 scale feet in width, length has still yet to be determined. As can also be seen, I have yet to work on the dome bases to match them to the boiler diameter(s). I'll be using a Grandt Line Porter bell when the time comes to detail.

So far so good for this project, but there's still a long way to go before it's done. A long, LONG, way to go unfortunately. Aside from splicing the frame together the next biggest challenge is to scratch build a cab. Although I'm sure installing a new motor, DCC and what now will have it's own challenges as well. But I'll cross that bridge when I get there.

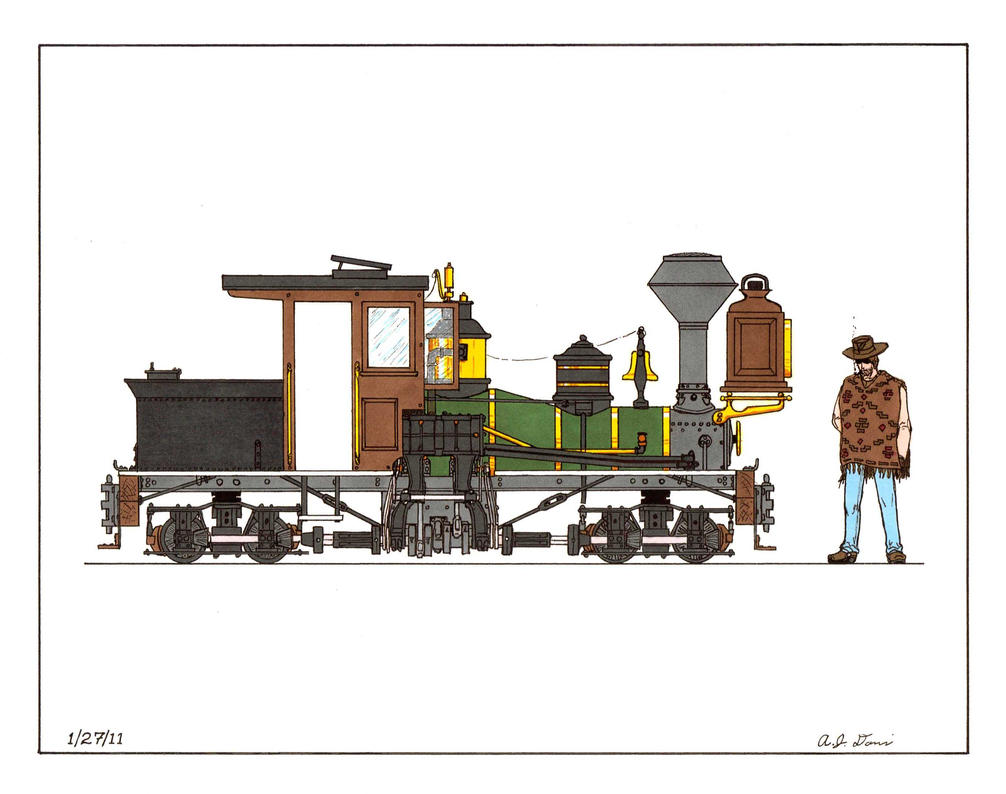
Now although this doesn't have anything to do with the current shay project I was recently inspired to model another locomotive for my 20" gauge tramway. I've developed a recent fondness for locomotives built by the Glover Machine Works of Merietta, GA. This interest most likely stemmed from the "Porter" like characteristics of their locomotives as well as the local history of Georgia. There was an image of one of their products that I fell in love with. it is a small 0-6-0 with a 2 axle tender and a steel cab. Sadly I don't have an exact image of the locomotive mentioned, but I can show one that is similar.


About the only differences are the two axle tender and a strait stack. Anyway, I'm contemplating making a model of this locomotive in On20, but as an outside frame 0-6-0. I'm still considering that, but the shay is still my primary project of interest. Thanks for staying tuned in and check back for more updates!